Wednesday 10 May 2017

Black & Gold


This tree took months.
Not because of the design or the method, but laziness. I started this and made it 1/2 way through. Got lazy.
Three months later I decided one day to finish it. I had noticed in the meantime studying the two and a half boards I've made  that my materials weren't foolproof; the push-pins I had been using seemed to have weakened over time (resulting in the flats falling off), and rust was beginning to appear  on a couple of caps. I invested in a glue-glun, stronger push-pins and a lacquer. I realise now that you can't actually get away without using some type of varnish; ideally a resin, but I'm anti-frames, so I'm not so sure how resin and I could get along.
This one I'll admit was trickier because so little of it was laid straight. Limited in my supply, I used a similar-sized board as my last two, only this one was white. In hindisght, I probably should have used a plain wooden board to suit the colours I used a little better.


I thought I'd save myself a mountain of time by laying out the board. Pre-pinning. I did this before, on my first piece, and swore to never do it again. It doesn't work. The amount of wasted time. Failed hopes. Don't do it. Don't ever do it.


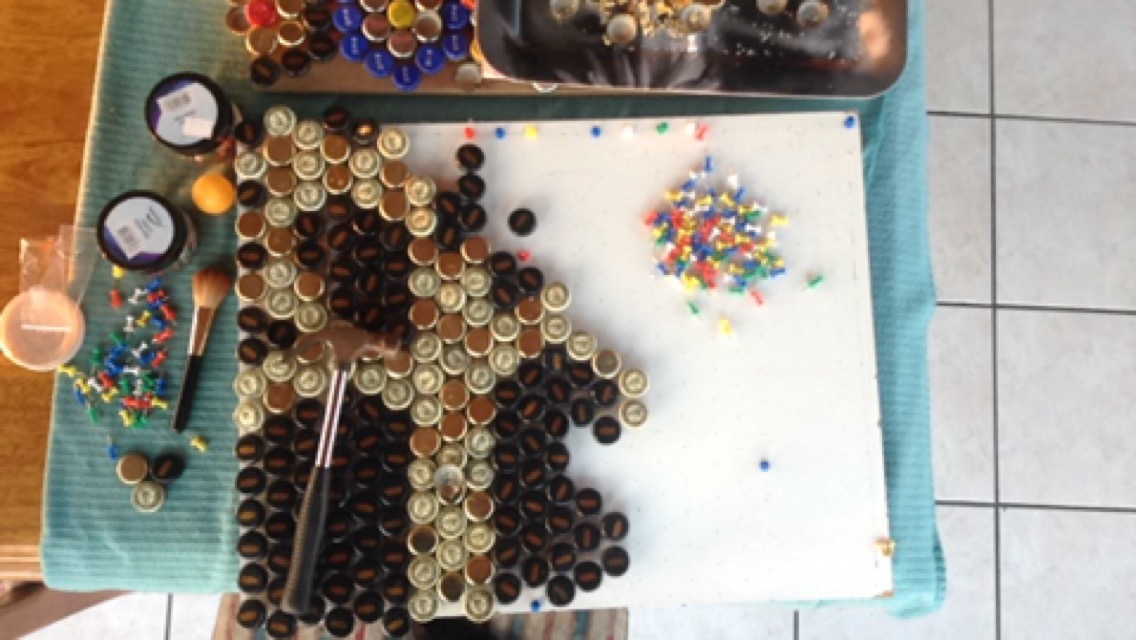
I restarted and resorted back to the good old time-consuming, back-breaking one-by-one method. One pencil mark. One pin. One bang. One scrape. One blob of glue. 2-4 minutes on and you'll get to do a whole other one - imagine! Sarcasm aside, I do enjoy the process, nomatter how arduous.


This was the easy part of the board. The branches are straight-edged on the left, but this wasn't my plan for the right-hand side. I wanted more stray branches, and I wanted it to appear as if the wind was attacking them.


Loose
Hammered


I map out the design on the board first, then either photograph and remove them or else just leave them there and push them out of the way as I go. Usually the latter. With this design I found it especially easy to lose my place and fucked up quite a few times. I had to be careful with placement - too much of the one colour too close together and I run the risk of being asked, "What is it?" (It has happened, and it's upsetting).


Just completed

After three coats of lacquer


Monday 13 March 2017

Ban Dana


Baby number two came quickly. This one was made in I think 3 evenings; its simple design and colours were to thank for that. This time I used a slightly smaller board with a white face. 


Flash + bottlecaps = and ugly photograph

The monotonous task that was scraping the insides! I've since invested in a gluegun, which has saved me a lot of time, scissors and hand-cramps. 


My collection thus far: Ban Dana & Honeycoma

Monday 20 February 2017

Honeycoma


People make art from waste all the time. Bottlecaps are a pretty type of waste, at least. 

I work in a bar and have done since I was a teenager. Throwing away bottlecaps was something I did on a daily basis. The idea only struck me mid-2016 that I should keep these and display them. Naturally, I sought the help of Google to reveal to me an idea surely arrived on the minds of others: bottlecap art. 

Online I saw some pretty cool pieces involving bottlecaps. Everybody seemed to either flatten them or use a grout or a resin to attach them to their desired surface, so I thought I'd shake it up a bit and try a new technique using materials perhaps a bit too classroom-friendly - push pins and glue. In my shed I found old cuts of what used to be our kitchen counter-top. Those, a rusty old hammer and a couple hundred bottlecaps completed my ingredients. I stared at them and felt like I was about to make a very unconventional and time-consuming cake; one that I had already decided would be named Honeycoma. No sweet pun intended.

1 - Laying it out. This stencil didn't help. I never saw it again. 
3 - I drew honeybcomb patterns but couldn't use them as proper outlines - they were never the right size!
2 -Began in a dirty workplace - the shed. For anyone thinking of doing something like this: think of your back. Source a table. 

4 - Deciding which bottlecaps to pair together was a fun part, but when I thought about their values it made me sad that this waste totaled up to more than I made that day - 24 bottlecaps at €63.00. 

5 - Pre-pinning isn't my thing. Too close together. I'll never get back those hours. 

6 - I had to scrape the inside of each bottlecap becuase the glue I decided to purchase just wasn't strong enough. This took aaaaages, but I felt giddy with each one that went on, so it was never too much of a trouble. 
7 - Slowly starting to take form


8 - I should probably work somewhere cleaner 


9 - Indoors! It really excited me at this stage, maybe that's the voodoo of primary colours.
10 - The final honeycomb
11 - The uneven surface created by pins


12 - The finished product. My intention is to remove the exposed bits of wood, but other than that c'est fini! Can you hear the psychedelic bees? Same.